

Jav
 Onyx Donator
-
Posts
8 -
Joined
-
Last visited
-
Days Won
2
Posts posted by Jav
-
-
Welcome to Jav's Guide to the Inferno
Infernal Cape is a must-have for any player striving for greatness. To be rewarded the Infernal Cape a player must complete the Inferno minigame.
To begin the minigame, you must first acquire a Fire cape, which is a lower-tier version of the Infernal cape, and give it to TzHaar-Ket-Keh. This is a one-time cost as TzHaar-Ket-Keh will not ask you for more Fire Capes on multiple visits to the Inferno. If you haven't got a fire cape, and not sure how to get one, check out my guide for the Fight Caves here:
Infernal cape provides the best all-around stats for melee-oriented characters and only a couple of other items can be used instead of it and that only on very specific conditions.

Boomscapes Version of the Inferno is very similar to that of OSRS. However Donator ranks are allowed to skip waves, based on their rank.
So, if you're a donator, look toward the wave that you'll be starting on.How to prepare for the Inferno
Inferno minigame is one of the hardest if not THE hardest solo PvM challenges in Runescape. As such, you must also be smart and bring sufficient supplies to the battle ahead.
Recommended Setup for Inferno:
Ancient magick's
Long-range weapon (Twisted bow/Armadyl Crossbow)
Blowpipe
11 Super Restores
7 Saradomin Brews
2 Ranging potions
1 Stamina potion
Make sure to use the best gear available to you and don’t forget to take your tactics into account and prepare accordingly (you might need different potions, for example). You will need to use prayer-flicking a lot, so make sure you are familiar with the technique and take time to practice. It is really recommended to have access to Armadyl or Justiciar, as Armadyl will boost your ranging bonus and magic defence bonus, while Justiciar is the best in slot defence bonus in the game.
Gear
In the Head Slot: If you dont have access to Justiciar, it has to be the Verac's helm.
In the Cape Slot: An Assembler Max cape is the best option, as it's bonus' and usefulness far outscale the other options. However, a simple 99 ranged cape would be just fine.
In the Necklace slot: It's definitely best to have an Occult/Anguish switch, to go with the different attack styles.
In the Ammo Slot: If using a Twisted bow, you'll want Dragon arrows, however if you've only got an armadyl crossbow, you'll need a switch of Ruby Bolt (e) and Diamond Bolt (e)'s.
In the weapon slot: This is for both ranged and mage attack styles. For ranged, you'll need either a Twisted bow or an Armadyl Crossbow, nothing else will really suffice. You'll also need to get hold of a blowpipe for the waves before Zuk. For Mage, it's recommended to have a Kodai wand, for sure. However, I have seen it done with an Ancient Staff. (Although I still wouldn't attempt without a Kodai). For Special Attacks, you need to get hold of a Saradomin Godsword, as it gives prayer and HP back to the user.
In the Body Slots: It's definitely recommended to have the maximum gear you can afford, such as Armadyl, Justiciar, Ancestral etc. However it can definitely be done with Karil's and Ahrim's. I personally would run Justiciar body and legs for Maging, while having Armadyl for ranging.
In the Shield slot: I said this in the Fight Caves guide, NOTHING is better than a crystal shield for this slot. It's low in price, and SO efficient. Obviously if you can afford an Elysian/Arcane then pick one up. However the crystal shield is MORE than okay.
Gloves, Boots and Ring slots: Barrows gloves. Also you'll need to get your hands on some Pegasian Boots, and a Ring of suffering. These item's aren't negotiable, as it's almost impossible without them.
Waves, Monsters and How to beat them
There are a total of 69 waves of monsters in the Inferno minigame. Each of these waves is more difficult than the last and at certain waves, you will face new challengers bent on destroying you. This will force you to change your tactics depending on the new addition and the wave, so make sure to keep a mental note of the wave number to react quickly when the next one starts.
There are nine types of monsters you will encounter in the Inferno. Two types are healers and the other seven are damage dealers. Monsters that deal damage can be safely spotted and played around while healers can be distracted and dispatched off without getting to do much healing.
NIBBLERS
Nibblers are pesky little pests whose entire goal is to ruin any positioning strategy involving pillars. Once spawned, they will move to a pillar and nibble on it until it is destroyed.
Pillars are essential for clearing the Inferno so a player will always have to prioritize Nibblers. Thanks to Nibblers spawning in groups and having low Hitpoints they are extremely vulnerable to Area of Effect spells and attacks.
BATS
Bats can be safely spotted just behind the pillar. Their attacks deal minor damage but they also drain stats. You want to get hit by them as little as possible.
Bat attack range is four squares. Keep this in mind when moving so that you keep the Bats where you want them to be. You can also use other monsters to get Bats stuck behind them.
BLOBS
Blobs are annoying for they will make you flick your Prayers a lot. They use both Magic and Ranged attacks. The attack they choose depends entirely on what type of attack you’re praying against. If you pray Ranged, they will use Magic attack and vice versa.
To check whether you’re doing this right, attack a Blob while letting it hit you and quickly hide behind a pillar. This can take time to get used to - don’t beat yourself up if you don’t immediately succeed.
Once they die, Blobs spawn three smaller blobs, each corresponding to an attack style (Melee, Ranged, Magic). These little monsters are here more as an opportunity for you to heal by casting Blood Barrage than an actual threat.
MELEE SNEK
In order to survive the Inferno, you will need to use every little dirty trick at your disposal. Jal-ImKot, a.k.a. Melee is a creature that you will get to safe spot the most.
Melee monster is large, occupying 16 tiles. This allows for a little more freedom when manipulating its position or making a maneuver yourself.
A tactic known as corner safe spot can be used against these overgrown snakes. You need to stand on the corner of the monster’s hitbox to prevent it from making attacks. If it can’t hit you for a while, Jal-ImKot will teleport to another position around the player. Teleport locations follow a pattern, so keep your eyes peeled and you won’t get surprised.
RANGER
Jal-Xil, the Ranger. Despite the name, the Ranger can also use melee attacks, though Ranged is it’s preferred style of combat. It attacks every 4 ticks and its low Defense makes it a good target for healing.
In most scenarios, Ranger will be a low priority target. Nevertheless, you should not miss a good opportunity to kill it if it presents itself.
MAGER
Jat-Zek is a creature that uses Mage attacks. These attacks are really powerful, hence you should always pray Protection Against Magic. The engagement tactics are almost identical to those of Ranger.
Mage has a unique ability to resurrect monsters that fell during the same wave. The revived monsters have half of their original HP. Due to this ability, you should make Mage your priority target.
If you can’t do this, then don’t worry too much – Mage can revive a fallen creature only once.
The Bosses, Before the Boss.
For those who think that the Inferno is just a protracted version of the TzHaar Fight cave – you are sorely mistaken. The Inferno is on another level. Here, the last waves are just one boss fight after another.
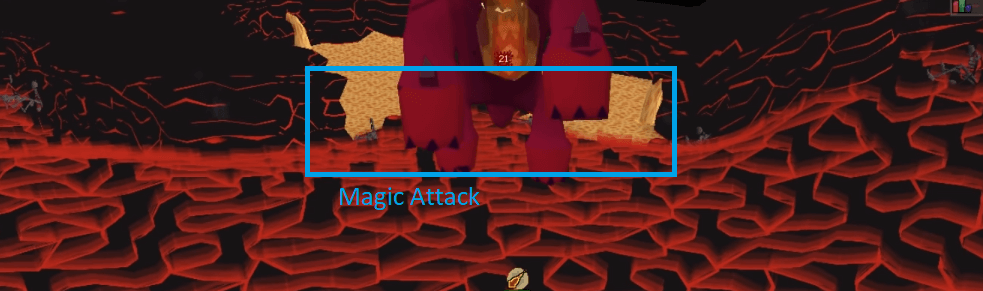
On the 67th Wave, comes Jad.
Mechanics of Jads are the same as those of THE Jad that reward you with Fire Cape. The main difference is that Jads in the Inferno are a lot more tenacious and have plenty of little helpers to make an adventurer's life into a living hell. Yt-HurKot’s will spawn during the fight to heal their Jad.
They can be distracted by the player and either eliminated or tanked until the big dog is put down. If you choose to tank the healers, simply make them line up one behind another so that only a single healer can hit you.
The best method to deal with them is to get them stuck behind Jad. This way they will be aiming at you, but unable to deal damage to you or heal Jad, which is a total win-win situation for you.
To do so, aggro all healers, make them come to you, and then run to the other side of Jad during his Magic/Ranged attack.
On the 68th wave, you will encounter three Jads. The downside is obvious, the upside is that once a Jad reaches 50% health, only three healers will spawn. The tactics of dealing with them are the same as with a single Jad.
TzKal - Zuk
TzKal-Zuk, the behemoth of the Inferno is the final boss of the minigame. This titanic monster inspires fear and awe and hits like a truck. The tactics change completely at this stage of the minigame.
First, TzKal-Zuk will push aside a pillar of stone to set itself free and attack the player. The stone moves in the lava river providing cover for the player. Make sure to stand behind the wall or you will perish.
Second, don’t think that you will get off that easy by just hiding behind the shield. After 3.5 minutes Range and Mage monsters will spawn that will attack the shield. You will have to aggro them and kill them or else they will destroy the shield, leave you exposed, and TzKal-Zuk will end you.
Third, once TzKal-Zuk reaches 50% health (600 HP), there will be a short break from continuous monster spawning. Heal during this time and recover your energy – you will need it.
Fourth, once you reduce TzKal-Zuk’s HP to 480 it will call forth Jads to attack the shield. Jads will summon healers, but you know how to deal with them already.
Fifth, at 240 HP four Jal-Mejjak’s will spawn to rapidly heal TzKal-Zuk, and TzKal-Zuk itself will enrage, attacking at a faster pace. Run with the shield to survive. Healers will shoot AoE fireballs at the player if attacked and Mage and Ranged monsters will keep spawning. This is the ultimate test of your abilities.
Killing TzKal-Zuk will despawn its minions regardless of their HP. Keep this in mind as it can be easier to finish off the big boss instead of its minions.
Best Inferno Tips and Tricks
Remember if there are a lot of monsters in a group, you can always move them around a bit while being behind a pillar. Make sure that you do not move out of the safe zone while doing this. Moving within the zone, however, will let you stack monsters in a way that allows you to engage them on your terms.
When the monsters in the stack no longer change position in relation to each other, you can try freezing them.
Always try to put the monsters in such a position that enables you to pick them off one by one. This will not only save you Prayer points and some intensive clicking but also reduce the risk of losing the minigame.
One death in Inferno means that you must start from the beginning, although you can logout to pause the game. It’s better to take a break from the intense fighting than going on the next wave burnt out.
Now, if two monsters are safe spotted behind a pillar and are in a single line, the monster in the back will hit you first once you leave the safety of the pillar. Use this to cast appropriate Prayer and keep in mind that you can click on the monster in the back to step outside safety and attack it, rather than having to click twice – the first click to move and then a second one to attack.
Throughout all waves in the Inferno, the best spot to hide behind and use to position monsters is the northern pillar. You can use others and sometimes may have to.
In such cases, it is recommended to move to the southern pillar while praying Mage, equipping the tankiest gear, and drinking potions, if necessary. The problem with the south pillar is that monsters can go around it and reach you.
Thanks for reading through my guide, and Good Luck in the Inferno!
-
Welcome to Jav's guide to an EASY Fire cape!
Note: This is a guide for a RANGED attempt at the Fight Caves.
Right here, is where I'll be going through ALL the steps, gear, safe spots etc.
Basically, everything you'll need to walk through the fight caves, and get yourself that illusive fire cape.
Note: It takes time to get used to the process, it's not exactly easy so don't get disappointed if you fail the first few attempts.
First of all, the TzHaar Fight Cave is a safe minigame, which means you will never lose your items when you're killed. Getting there can be done easily by using the Fight Cave teleport, under the minigames tab at the Nexus at home.
Recommended Stats (although it definitely can be done lower):
75 + Ranged
70 + Hitpoints
43+ Prayer
60 + Defence
75 Ranged isn't essential, as you definitely can complete the fight caves without the use of a blowpipe, but it really will speed up your time to have that in your arsenal.
Fight Caves on Boom is a little different to OSRS however, as Donator Ranks will skip waves based on their rank.
Gear
So, let's start with our gear setups, inventory setup, and everything you'll need for both wealthy, and the not so wealthy.
In the helmet slot: It's recommended to either have a tank helmet, for example the Verac's helm, or a blessed d'hide coif.
This is because the Verac's helm with give massive bonus' toward your defence stats which will massively increase your survivability.
The coif, however, gives prayer bonus which in turn, will stop you needed so many super restore potions.
In the Cape slot: Obviously, the Ava's assembler would be the go-to option, however if you haven't accessed Vorkath yet, the Accumulator will be just fine.
In the Necklace slot: A Necklace of Anguish is the Best in Slot for the job, however if you can't quite get your hands on one, an Amulet of Fury, or even an Amulet of Glory will suffice.
In the Ammo Slot: This is where it gets awkward, If using a crossbow, Diamond Bolts (e) will be the go to option - they can be purchased from the ranged store at home. However if you have access to the Blowpipe, it's a much better idea to use a God Blessing. You can get these from clues, or you can buy Rada's blessing from the Vote Store, which is just as good.
In the Weapon Slot: As I mentioned earlier, the Blowpipe is by far the best option when it comes to accessibility as well as cost and effectiveness. However if you're really early into your account, you'll likely not have access to one. So a simple rune crossbow works perfectly, and if you have a dragon crossbow or an Armadyl crossbow, even better! However for the easiest time in the fight caves, I really do recommend trying to pick yourself up a Toxic Blowpipe.
In the Chest, Legs and Boots Slots: I highly recommend just picking up some blessed d'hide . It'll help with damage output, as well as giving a massive prayer bonus, which will carry you through the early waves. However, black d'hide should be just fine, as well as rune boots.
In the shield slot (for crossbow users only): If you can get your hands on one, I HIGHLY recommend picking up a crystal shield. It has massive defensive bonus' and isn't too pricey, however if you're strapped for cash, you can use a god book, or even a rune kiteshield.
In the Gloves Slot: Barrows Gloves. Nothing else to be said.
Finally, in the Ring slot: For maximum efficiency, an Archers Ring (I) will always be the best option and will definitely be the best investment on this list if you're strapped for cash. There really isn't an alternative to the archers ring, as other rings don't give any where near as good of a bonus.
Inventory
I have a picture, from when I was learning fight caves a long time ago, and to this day I still stick by it.
Your inventory should look something like this.
It should consist of:
14 Super Restores, for restoring your prayer as well as removing the debuff's the saradomin brew's will give.
10 Saradomin Brews, quick food and defence bonus', who wouldn't want them.
4 Ranged Potions, for boosting your ranged, duh.
Waves, and what to expect.
Now, we'll take a deep dive into what the waves are like, and what you should expect to fight.
The Wave system works in a multiplicative sense, so you kill one monster, then two of that monster spawn the next wave. Then after you kill two of that monster, a new, stronger, monster spawns. All the way up to wave 63 when two of the strongest monsters, spawn TzTok - Jad.
Monsters:
1. Tz-Kih (Bat): Uses melee and drains your prayer (highest priority to kill) (don’t pray).
2. Tz-Kek (Blob): Uses melee and has a max hit of 7 and splits in two upon death (very low priority to kill) (don’t pray).
3. Tok-Xil (Ranger): Uses ranged and melee (medium priority to kill) (praying protect from missiles is needed while safe-spotting it)
4. Yt-MejKot(Meleer): Uses melee (very low priority to kill) (can be safe-spotted).
5. Ket-Zek (Mager): Uses mage and melee (Low priority to kill) (praying protect from magic is needed while safes-spotting it)
Safespotting
The best way to safe-spot TzHaar Fight Cave monsters is by using the Italy-rock to trap the Rangers, Meleers, and the Magers (Yt-Mejkot is the only meleer to trap). The Italy-rock is located south of the cave entrance and the way you trap the monster is totally up to you. You can just lure them until you trap them behind the Italy-rock.
What you should do for each wave:
Wave 1 - 6:
Just keep killing everything you see and praying is not needed.
Monsters: Tz-Kih + Tz-Kek (Bat and Blob)
Wave 7 - 14:
Turn on Protect from Missiles prayer because Rangers will start spawning from this wave 7 until wave 14. You will also need to safe-spot them around the Italy Rock.
Monsters: Tz-Kih + Tz-Kek + Tok-Xil (Bat, Blob and Ranger)
Wave 15 - 21:
Meleers will start spawning and you will have to safe-spot them around the Italy Rock. Rangers won’t spawn again until wave 22 so you don’t have to Pray.
Monsters: Tz-Kih + Tz-Kek + Yt-MejKot (Bat, Blob and Meleer)
Wave 22 - 30:
Turn on Protect from Missiles prayer again while safe-spotting and meleers and the rangers.
Monsters: Tz-Kih + Tz-Kek + Yt-MejKot + Tok-Xil (Bat, Blob, Meleer and Ranger)
Wave 31 - 37:
From wave 31, the Fight caves is exactly the same as 1 - 30, just with a mager on every wave. Turn on Protect from Magic because Magers will start spawning while Meleers and Rangers won’t spawn. Using the Italy Rock as a safe-spot is still necessary because Magers can still hit you with melee.
Monsters: Tz-Kih + Tz-Kek + Ket-Zek (Bat, Blob and Mager)
Wave 38 - 45:
Rangers will spawn again so keep praying Protect from Magic while giving the highest priority to kill Rangers. You must keep safe-spotting around the Italy Rock (try to kill Rangers fast before safe-spotting).
Monsters: Tz-Kih + Tz-Kek + Ket-Zek + Tok-Xil (Bat, Blob, Mager and Ranger)
Wave 46 - 52:
Meleers will spawn again and Rangers will not appear during these waves. Keep praying Protect from Magic while safe-spotting Meleers and Magers.
Monsters: Tz-Kih + Tz-Kek + Ket-Zek + Yt-MejKot (Bat, Blob, Mager and Meleer)
Wave 53 - 60:
Each wave will include the 3 attack style. Keep using Protect from Magic and give the highest priority to kill Rangers as fast as possible (especially during Wave 60) while safe-spotting the others. These are the hardest of the waves. (Apart from Jad)
Monsters: Tz-Kih + Tz-Kek + Ket-Zek + Yt-MejKot + Tok-Xil (Bat, Blob, Mager, Meleer and Ranger)
Wave 61
Keep using Protect from Magic while safe-spotting the meleers. Rangers won’t appear again from now on.
Monsters: Ket-Zek + Yt-MejKot (Mager and Meleer)
Wave 62
Two Magers will appear during this wave and the Orange Mager is where Jad will appear in the 63rd wave. Keep using Protect from Magic, kill the Red Mager then the Orange Mager and get ready to kill Jad.
Monsters: Ket-Zek only
How to Kill TzTok - Jad
TzTok-Jad uses all attack styles that means keeping a distance will prevent him from using Melee. Jad will keep switching between Range and Magic attack styles, the problem here is to keep up with him using your protection prayers. Don't worry, I've got a Jad strategy that works! Jad's movement while using Range is not the same when he uses Magic, so pay attention to his movement to be able to counter his attack.
Range hit is when Jad raises his legs quickly in the air, and slams his feet on the floor:
Magic hit is when Jad raises his legs slowly, and stands on his back legs:
Both of these movements are very different and can be countered easily if you are fully focused on Jad's legs.
At 50% Health, 4 Healers will spawn around Jad to heal him, at this point you should prevent them from doing that by luring them using your weapon.
These Healers use melee and have a max hit of 14, which means you should kill them first while keeping an eye on Jad's movement to counter his attack.
You can also attack the healers, then run to the opposite side of Jad to safespot them around the back of the big bad Jad.
A few tips to remember:
You can always log out to save your progress.
Never use the game sound
Always disable Auto-retaliate
Keep an eye on your Prayer counter and do not spam eat Saradomin Brews, as it will lower your stats.
It’s better to use Prayer Hotkeys, these can be set up in the setting section in game.
If you die by the last hit of Jad before his death, the Fire cape won’t be awarded.
Thanks for reading through my Fight Caves guide, and good luck on your Fire Cape!
-
 1
1
-


.png.cdc352d12deba22b47e3bf9c68ff722a.png)
.png.b74943e51dede91c8ee993d31ff73d94.png)

.png.d589c913fcb986822b91535241b134a7.png)
.png.bfedc109de98486027e963d23460a30f.png)
.png.5a5a1553f1e3f12b5bed5a6f2ff72970.png)
.png.db91604af62a653e18f59caecbf7935a.png)
_detail(1).png.eee3f933c2b7f4afc80c8badc21211b8.png)
.png.d92f78626f130aedf0297d29ab1a097d.png)
.png.4b30734041192a23f49104769818b54b.png)
_detail(1).png.2202a28ec784047f48eba83cedd1fc7d.png)
.png.37ef45414350dce1c69f9099d1019bf6.png)
.png.535dc70d63a1895c8480a6875ea8532c.png)
.png.bf5de9ee0900db489ac11a0cde70e840.png)
_detail(1).png.7e1bf9d936c10ed32af268d8097295d8.png)


.png.ac5a1362efeb986431eec701ff5db119.png)
.png.9eddc73c8682b01c32397b09b9bbb075.png)


Jav's Access to Slayer guide! - All bout Monsters
in Miscellaneous
Posted · Edited by Jav
Jav's ACCESS TO SLAYER Guide!
Monsters, their locations, their descriptions and how to kill em!
This guide is all to do with Slayer. It is here to help people figure out what their slayer task is, what they'll need, and where they can find it.
Big shout out to @99s for the suggestion on this, great idea!
This guide will be set out in a very specific format, and for those who want to use it on a regular basis, I recommend using the CTRL + F function so you can find your task easily, rather than scrolling through the whole guide!
Also, all the monster names will be in PURPLE for easy-on-the-eye access to the right monster for you.
Usually I like to put in pictures, and in this case it would be of all the locations of the monsters etc, but you could probably imagine how long that would take.
And I have a job
So let's get started!
Abberant Spectres
Slayer Level: 60
Location: Slayer Tower, Stronghold Slayer Cave
Required Items: Nose peg or Slayer helm
Attribute: Undead Attack Style: Magic
Alternatives: Deviant Spectres
Abyssal Demons
Slayer Level: 85
Location: Slayer Tower, Abyssal Area, Catacombs of Kourend
Required Items: None
Attribute: Demon Attack Style: Melee
Alternatives: Abyssal Sire
Adamant Dragons
Slayer Level: 1
Location: Lithkren Vault
Required Items: Dragonfire Shield (DFS), Anti-dragon shield, Antifire Potions, Insulated Boots
Attribute: Draconic, Fiery Attack Style: Melee, Ranged, Magic, Dragonfire
Alternatives: None
Ankous
Slayer Level: 1
Location: Stronghold of Security, Wilderness Volcano, Stronghold Slayer Cave, Catacombs of Kourend
Required Items: None
Attribute: Undead Attack Style: Melee
Alternatives: None
Avansie
Slayer Level: 1
Location: God Wars Dungeon
Required Items: Ranged or Magic Weaponry
Attribute: None Attack Style: Ranged
Alternatives: Kree'Arra or any of it's minions
Bandits
Slayer Level: 1
Location: Bandit Camp
Required Items: None
Attribute: None Attack Style: Melee
Alternatives: None
Banshees
Slayer Level: 15
Location: Slayer Tower
Required Items: Earmuffs or Slayer helm
Attribute: Undead Attack Style: Magical Melee
Alternatives: Twisted Banshee
Basilisks
Slayer Level: 40
Location: Fremennik Slayer Dungeon, Jormungands Prison
Required Items: Mirror Shield
Attribute: None Attack Style: Melee
Alternatives: Basilisk Knights
Bats
Slayer Level: 1
Location: Paterdomus, Morytania
Required Items: None,
Attribute: None Attack Style: Melee
Alternatives: Giant Bat, Albino Bat, Deathwing
Bears
Slayer Level: 1
Location: East Ardougne, South of Varrock
Required Items: None
Attribute: None Attack Style: Melee
Alternatives: Black Bear, Grizzly Bear, Callisto
Birds
Slayer Level: 1
Location: Across West Lumbridge, Port Sarim Pier, South of Falador
Required Items: None
Attribute: None Attack Style: Melee
Alternatives: Chicken, Mounted Terrorbird Gnome, Rooster, Terrorbird, Vulture, Undead Chicken
Black Demons
Slayer Level: 1
Location: Taverly Dungeon, Edgeville Dungeon, Brimhaven Dungeon, Catacombs of Kourend, Fire Chasm
Required Items: None
Attribute: Demon Attack Style: Melee
Alternatives: Demonic Gorilla, Skotizo
Black Dragons
Slayer Level: 1
Location: Taverly Dungeon, Lava Maze
Required Items: DFS, Anti-Dragon Shield, Antifire Potion
Attribute: Draconic, Fiery Attack Style: Melee, Dragonfire
Alternatives: Baby Black Dragon, King Black Dragon, Brutal Black Dragon
Black Knights
Slayer Level: 1
Location: Lava Maze
Required Items: None
Attribute: None Attack Style: Melee
Alternatives: None
Bloodvelds
Slayer Level: 50
Location: Slayer Tower, God Wars Dungeon, Meiyerditch Dungeon, Stronghold Slayer Cave
Required Items: None
Attribute: None Attack Style: Magical Melee
Alternatives: Mutated Bloodvelds (Catacombs of Kourend)
Blue Dragons
Slayer Level: 1
Location: Taverly Dungeon, Heroes' Guild, Corsair Cove Dungeon
Required Items: DFS, Anti-Dragon Shield, Antifire Potion
Attribute: Draconic, Fiery Attack Style: Melee, Dragonfire
Alternatives: Baby Blue Dragon, Brutal Blue Dragon, Vorkath
Brine Rats
Slayer Level: 47
Location: Brine Rat Cavern
Required Items: None
Attribute: None Attack Style: Melee
Alternatives: None
Bronze Dragons
Slayer Level: 1
Location: Brimhaven Dungeon, Catacombs of Kourend
Required Items: DFS, Anti-Dragon Shield, Antifire Potion
Attribute: Draconic, Fiery Attack Style: Melee, Dragonfire
Alternatives: None
Cave Bugs
Slayer Level: 7
Location: Lumbridge Swamp Caves
Required Items: Bullseye Lantern
Attribute: None Attack Style: Melee
Alternatives: None
Cave Crawlers
Slayer Level: 10
Location: Fremennik Slayer Dungeon, Lumbridge Swamp Caves
Required Items: None
Attribute: None Attack Style: Melee, Poison
Alternatives: None
Cave Horrors
Slayer Level: 58
Location: Mos Le'Harmless Cave
Required Items: Witchwood Icon, Bullseyes Lantern
Attribute: None Attack Style: Melee, Magical Melee
Alternatives: None
Cave Slimes
Slayer Level: 17
Location: Lumbridge Swamp Caves
Required Items: Bullseye Lantern
Attribute: None Attack Style: Melee, Poison
Alternatives: None
Cave Kraken
Slayer Level: 87
Location: Kraken Cove
Required Items: None
Attribute: None Attack Style: Magic
Alternatives: Kraken (Boss)
Chaos Druids
Slayer Level: 1
Location: Edgeville Dungeon, Chaos Temple
Required Items: None
Attribute: None Attack Style: Melee
Alternatives: Elder Chaos Druid
Cockatrices
Slayer Level: 25
Location: Fremennik Slayer Dungeon
Required Items: Mirror Shield
Attribute: None Attack Style: Melee
Alternatives: None
Cows
Slayer Level: 1
Location: North-East of Lumbridge Castle, South of Falador
Required Items: None
Attribute: None Attack Style: Melee
Alternatives: Calf
Crawling Hands
Slayer Level: 5
Location: Slayer Tower
Required Items: None
Attribute: None Attack Style: Melee
Alternatives: None
Crocodiles
Slayer Level: 1
Location: Near Elid, Southern Shore of Kharidian Desert
Required Items: None
Attribute: None Attack Style: Melee
Alternatives: None
Dagannoths
Slayer Level: 1
Location: Lighthouse, Waterbirth Dungeon, Catacombs of Kourend, Jormungands Prison
Required Items: None
Attribute: None Attack Style: Ranged or Melee
Alternatives: Dagannoth Fledgeling, Dagannoth Kings (Supreme, Prime and Rex)
Dark Beasts
Slayer Level: 90
Location: Mourner Tunnels, Iorweth Dungeon
Required Items: None
Attribute: None Attack Style: Melee, Ranged
Alternatives: None
Dark Warriors
Slayer Level: 1
Location: Dark Warriors Fortress
Required Items: None
Attribute: None Attack Style: Melee
Alternatives: None
Dogs
Slayer Level: 1
Location: Ardougne, McGrubors Wood, Black Arm Gang Hideout in Brimhaven, Brimhaven Dungeon
Required Items: None
Attribute: None Attack Style: Melee
Alternatives: Guard Dog, Wild Dog, Jackal
Drakes
Slayer Level: 84
Location: Karuulm Slayer Dungeon
Required Items: Boots of Stone or Brimstone Boots
Attribute: Draconic Attack Style: Melee
Alternatives: None
Dust Devils
Slayer Level: 65
Location: Smoke Dungeon, Catacombs of Kourend
Required Items: Facemask or Slayer helm
Attribute: None Attack Style: Melee
Alternatives: None
Dwarves
Slayer Level: 1
Location: Ice Mountain, Mining Guild, Keldagrim, Dwarven mine, beneath White Wolf Mountain, south of Yanille
Required Items: None
Attribute: None Attack Style: Melee
Alternatives: Black Guard, Chaos Dwarf
Earth Warriors
Slayer Level: 1
Location: Edgeville Dungeon
Required Items: None
Attribute: None Attack Style: Melee
Alternatives: None
Elves
Slayer Level: 1
Location: Lletya, Iorwerth Camp, Prifiddinas
Required Items: None
Attribute: None Attack Style: Melee or Ranged
Alternatives: Mourner (level 108 only)
Ent
Slayer Level: 1
Location: Forests north and east of the Chaos Temple in Wilderness
Required Items: None
Attribute: None Attack Style: Melee
Alternatives: None
Fever Spiders
Slayer Level: 42
Location: Braindeath Island
Required Items: Slayer Gloves
Attribute: None Attack Style: Melee
Alternatives: None
Fire Giants
Slayer Level: 1
Location: Brimhaven Dungeon, Deep Wilderness Dungeon, Stronghold Slayer Cave, Catacombs of Kourend
Required Items: None
Attribute: Fiery Attack Style: Melee
Alternatives: None
Flesh Crawlers
Slayer Level: 1
Location: Stronghold of Security
Required Items: None
Attribute: None Attack Style: Melee
Alternatives: None
Fossil Island Wyverns
Slayer Level: 66
Location: Wyvern Cave north east of fossil island
Required Items: Mind/Elemental Shield, DFS, Ancient Wyvern Shield
Attribute: Draconic Attack Style: Melee, Ranged, Ice Breath
Alternatives: Ancient Wyvern, Spitting Wyvern, Taloned Wyvern, Long-Tailed Wyvern
Gargoyles
Slayer Level: 75
Location: Slayer Tower
Required Items: Rock Hammer or Rock Thrownhammer
Attribute: None Attack Style: Melee
Alternatives: Grotesque Guardians
Ghosts
Slayer Level: 1
Location: Varrock Sewers, Stronghold of Security, Taverly Dungeon, Catacombs of Kourend
Required Items: None
Attribute: Undead Attack Style: Melee
Alternatives: Tortured Soul
Goblins
Slayer Level: 1
Location: East of Lumbridge Castle
Required Items: None
Attribute: None Attack Style: Melee
Alternatives: General Graardor's Minions
Greater Demons
Slayer Level: 1
Location: Brimhaven Dungeon, Demonic Ruins, Lava Maze Dungeon, Catacombs of Kourend, Fire Chasm
Required Items: None
Attribute: Demon Attack Style: Melee
Alternatives: K'ril Tsutsaroth, Skotizo
Green Dragons
Slayer Level: 1
Location: West Dragons (wilderness tele), East Dragons (Wilderness tele), South of Lava Maze
Required Items: DFS, Anti-Dragon Shield, Antifire Potion
Attribute: Draconic, Fiery Attack Style: Melee, Dragonfire
Alternatives: Baby Green Dragon, Brutal Green Dragon
Harpie Bug Swarms
Slayer Level: 33
Location: Karamja
Required Items: Bug Lantern
Attribute: None Attack Style: Melee
Alternatives: None
Hellhounds
Slayer Level: 1
Location: Taverly Dungeon, east of Deserted Keep, Karuulm Slayer Dungeon, God Wars Dungeon, Stronghold Slayer Cave, Catacombs of Kourend
Required Items: None
Attribute: None Attack Style: Melee
Alternatives: Cerberus
Hill Giants
Slayer Level: 1
Location: Deep Wilderness Dungeon, Edgeville Dungeon, Lava Maze, Taverly Dungeon, Catacombs of Kourend
Required Items: None
Attribute: None Attack Style:
Alternatives: Cyclops
Hobgoblins
Slayer Level: 1
Location: Asgarnian Ice Dungeon, Edgeville Dungeon, God Wars Dungeon, Witchaven Dungeon
Required Items: None
Attribute: None Attack Style: Melee
Alternatives: None
Hydras
Slayer Level: 95
Location: Karuulm Slayer Dungeon
Required Items: none
Attribute: Draconic Attack Style: Melee, Ranged, Poison
Alternatives: Alchemical Hydra
Icefiends
Slayer Level: 1
Location: Ice Mountain, God Wars Dungeon, Wilderness God Wars Dungeon
Required Items: None
Attribute: None Attack Style: Melee
Alternatives: None
Ice Giants
Slayer Level: 1
Location: White Wolf Mountain, Asgarnian Ice Caves
Required Items: None
Attribute: None Attack Style: Melee
Alternatives: None
Ice Warriors
Slayer Level: 1
Location: White Wolf Mountain, Asgarnian Ice Caves
Required Items: None
Attribute: None Attack Style: Melee
Alternatives: None
Infernal Mages
Slayer Level: 45
Location: Slayer Tower
Required Items: None
Attribute: None Attack Style: Magic
Alternatives: None
Iron Dragons
Slayer Level: 1
Location: Brimhaven Dungeon, Catacombs of Kourend
Required Items: DFS, Anti-Dragon Shield, Antifire Potion
Attribute: Draconic, Fiery Attack Style: Melee, Dragonfire
Alternatives: None
Jellies
Slayer Level: 52
Location: Fremennik Slayer Dungeon
Required Items: None
Attribute: None Attack Style: Magical Melee
Alternatives: Warped Jelly
Jungle Horros
Slayer Level: 1
Location: Mos Le'Harmless
Required Items: None
Attribute: None Attack Style: Melee
Alternatives: None
Kalphites
Slayer Level: 1
Location: Kalphite Lair, Kalphite Cave
Required Items: None
Attribute: Kalphite Attack Style: Melee
Alternatives: Kalphite Queen, Kalphite Guardian
Killerwatts
Slayer Level: 37
Location: Killerwatt Plane
Required Items: Insulated Boots
Attribute: None Attack Style: Magical Melee, Ranged
Alternatives: None
Kurasks
Slayer Level: 70
Location: Fremennik Slayer Dungeon, Iorwerth Dungeon
Required Items: Leaf-Bladed Spear, Slayer dart (for magic), Broad Arrows/Bolts (for ranged)
Attribute: Leafy Attack Style: Melee
Alternatives: None
Lava Dragons
Slayer Level: 1
Location: Lava Dragon Isle
Required Items: DFS, Anti-dragon shield, Antifire Potion
Attribute: Draconic, Fiery Attack Style: Melee, Dragonfire
Alternatives: None
Lesser Demons
Slayer Level: 1
Location: Wizard's Tower, Karamja Dungeon, Demonic Ruins, Lava Maze, Fire Chasm, Catacombs of Kourend
Required Items: None
Attribute: Demon Attack Style: Melee
Alternatives: None
Lizardmen
Slayer Level: 1
Location: Lizardmen Settlement, Lizardmen Canyon
Required Items: None
Attribute: None Attack Style: Ranged, Melee
Alternatives: Lizardman Brute, Lizardman Shaman
Lizards
Slayer Level: 22
Location: Kharidian Desert
Required Items: Ice Cooler
Attribute: None Attack Style: Melee
Alternatives: None
Magic Axes
Slayer Level: 1
Location: Magic Axe Hut
Required Items: Lockpick
Attribute: None Attack Style: Melee
Alternatives: None
Mammoth
Slayer Level: 1
Location: West of Chaos Temple
Required Items: None
Attribute: None Attack Style: Melee
Alternatives: None
Mithril Dragons
Slayer Level: 1
Location: Ancient Cavern
Required Items: DFS, Anti-dragon shield, Antifire Potion
Attribute: Draconic, Fiery Attack Style: Melee, Magic, Ranged, Dragonfire
Alternatives: None
Minotaurs
Slayer Level: 1
Location: Stronghold of Security
Required Items: None
Attribute: None Attack Style: Melee
Alternatives: None
Mogres
Slayer Level: 32
Location: Mudskipper Point
Required Items: Fishing Explosive
Attribute: None Attack Style: Melee
Alternatives: None
Monkeys
Slayer Level: 1
Location: Karamja, Mos Le'harmless, Ardougne Zoo
Required Items: None
Attribute: None Attack Style: Melee
Alternatives: Monkey Guard, Monkey Archer, Zombie Monkey, Skeletal Monkey
Moss Giants
Slayer Level: 1
Location: Brimhaven Dungeon, North of Black Chin Spot in Wilderness, Catacombs of Kourend
Required Items: None
Attribute: None Attack Style: Melee
Alternatives: None
Nechryael
Slayer Level: 80
Location: Slayer Tower, Catacombs of Kourend
Required Items: None
Attribute: Demon Attack Style: Melee
Alternatives: None
Ogres
Slayer Level: 1
Location: West of Yanille, South of Castle Wars, God Wars Dungeon
Required Items: None
Attribute: None Attack Style: Melee
Alternatives: None
Otherworldly Beings
Slayer Level: 1
Location: Zanaris
Required Items: None
Attribute: None Attack Style: Melee
Alternatives: None
Pirate
Slayer Level: 1
Location: Pirates Cove
Required Items: None
Attribute: None Attack Style: Melee
Alternatives: None
Pyrefiends
Slayer Level: 30
Location: Fremennik Slayer Dungeon, Smoke Dungeon, God Wars Dungeon, Wildy God Wars Dungeon, Iorwerth Dungeon
Required Items: None
Attribute: Fiery Attack Style: Magical Melee
Alternatives: Pyrelord
Red Dragons
Slayer Level: 1
Location: Brimhaven Dungeon, Catacombs of Kourend (Brutals)
Required Items: DFS, Anti-dragon shield, Antifire potion
Attribute: Draconic, Fiery Attack Style: Melee, Dragonfire
Alternatives: Baby Red Dragons, Brutal Red Dragons
Revenants
Slayer Level: 1
Location: Revenant Caves (Wildy)
Required Items: Bracelet of Ethereum (not necessary, but if you get it as a drop, charge it with ether and wear it)
Attribute: Undead Attack Style: Melee, Ranged, Magic
Alternatives: None
Rockslugs
Slayer Level: 20
Location: Fremennik Slayer Dungeon, Lumbridge Swamp Caves
Required Items: Bag of Salt
Attribute: None Attack Style: Melee
Alternatives: None
Rogues
Slayer Level: 1
Location: Rogue's Castle
Required Items: None
Attribute: None Attack Style: Melee
Alternatives: None
Rune Dragons
Slayer Level: 1
Location: Lithkren Dungeon
Required Items: DFS, Anti-dragon shield, Antifire potion, Insulated Boots
Attribute: Draconic, Fiery Attack Style: Slash, Ranged, Magic, Dragonfire
Alternatives: None
Scorpions
Slayer Level: 1
Location: Al-Kharid Mine, Dwarven Mines, Ardougne Zoo, Stronghold of Security, Varrock Sewers, Wilderness
Required Items: None
Attribute: None Attack Style: Melee
Alternatives: None
Shades
Slayer Level: 1
Location: Mort'ton, Shade Catacombs, Catacombs of Kourend
Required Items: None
Attribute: Shade, Undead Attack Style: Melee
Alternatives: None
Shadow Warriors
Slayer Level: 1
Location: Legend's Guild Basement
Required Items: None
Attribute: None Attack Style: Melee
Alternatives: None
Skeletal Wyverns
Slayer Level: 72
Location: Asgarnian Ice Dungeon
Required Items: Mind/Elemental Shield or DFS
Attribute: Draconic Attack Style: Melee, Ranged, Ice Breath
Alternatives: None
Skeletons
Slayer Level: 1
Location: Edgeville Dungeon, Taverly Dungeon, Stronghold of Security
Required Items: None
Attribute: Undead Attack Style: Melee
Alternatives: Vet'ion
Smoke Devils
Slayer Level: 93
Location: Smoke Devil Dungeon
Required Items: Facemask or Slayer Helm
Attribute: None Attack Style: Magical Ranged
Alternatives: Thermonuclear Smoke devil
Spiders
Slayer Level: 1
Location: Lumbridge Castle Basement, Stronghold of Security
Required Items: None
Attribute: None Attack Style: Melee
Alternatives: Venenatis, Giant Spider, Poison Spider, Blessed Spider, Jungle Spider, etc.
Spiritual Creatures
Slayer Level: 1
Location: God Wars Dungeon, Wildy God Wars Dungeon
Required Items: None
Attribute: None Attack Style: Varies with Target
Alternatives: None
Steel Dragons
Slayer Level: 1
Location: Brimhaven Dungeon, Catacombs of Kourend
Required Items: DFS, Anti-dragon shield, Antifire Potion
Attribute: Draconic, Fiery Attack Style: Melee, Dragonfire
Alternatives: None
Suqahs
Slayer Level: 1
Location: Lunar Isle
Required Items: None
Attribute: None Attack Style: Melee, Magic
Alternatives: None
Terror Dogs
Slayer Level: 40
Location: Tarn's Lair
Required Items: None
Attribute: None Attack Style: Melee
Alternatives: None
Trolls
Slayer Level: 1
Location: Trollheim, Death Plateau
Required Items: None
Attribute: None Attack Style: Melee, Ranged
Alternatives: None
Turoths
Slayer Level: 55
Location: Fremennik Slayer Dungeon
Required Items: Leaf-bladed spear, Slayer Dart (magic), Broad arrows/bolts (ranged)
Attribute: Leafy Attack Style: Melee
Alternatives: None
Vampyres
Slayer Level: 1
Location: God Wars Dungeon, Wilderness God Wars Dungeon, Haunted Woods, Darkmeyer
Required Items: None
Attribute: Vampyre Attack Style: Melee
Alternatives: None
Wall Beasts
Slayer Level: 35
Location: Lumbridge Swamp Caves
Required Items: Spiny Helmet or Slayer helm
Attribute: None Attack Style: Melee
Alternatives: None
Waterfiends
Slayer Level: 1
Location: Ancient Cavern, Kraken Cove
Required Items: None
Attribute: None Attack Style: Magic, Magical Ranged
Alternatives: None
Werewolves
Slayer Level: 1
Location: Canifis, God Wars Dungeon, Wilderness God Wars Dungeon
Required Items: None
Attribute: None Attack Style: Melee
Alternatives: None
Wolves
Slayer Level: 1
Location: Stronghold of Security, White Wolf Mountain
Required Items: None
Attribute: None Attack Style: Melee
Alternatives: None
Wyrms
Slayer Level: 62
Location: Karuulm Slayer Dungeon
Required Items: Boots of Stone, Brimstone Boots
Attribute: Draconic Attack Style: Melee, Magical Ranged
Alternatives: None
Zombies
Slayer Level: 1
Location: Edgeville Dungeon, Graveyard of Shadows, Stronghold of Security, Varrock Sewers
Required Items: None
Attribute: Undead Attack Style: Melee
Alternatives: Every zombie class except Zogres and Zombie Monkeys
Zygomites
Slayer Level: 57
Location: Fossil Island, Zanaris
Required Items: Fungicide, Fungicide spray
Attribute: None Attack Style: Magical Melee, Magical Ranged
Alternatives: Ancient Zygomite
Slayer masters, and their tasks.
Certain slayer masters, only give certain tasks. As a rule, the higher level slayer masters, give the widest range of tasks. But there is a few that escape their duristiction.
For example, Abyssal Demons, can only be given by Duradel, Nieve and Konar.
As a rule, players looking for the hardest tasks they can get or the highest XP, they should always head toward the highest level slayer master they can possibly use. Just to make sure they're getting the right tasks.
On BoomScape, we're privileged enough to have Steve, our resident BOSS TASK slayer master. He unlocks for players who have achieved 95 slayer, and only gives boss tasks such as; Zulrah, Vorkath, K'ril Tsutsaroth etc.
Again, I can only apologise for the formality of this guide. However if anyone has any suggestions of things I could add to the guide, please get in touch!
Thanks for using Jav's Access to Slayer guide! Good hunting!
Disclaimer: This guide took a LOT of hours, I'd really appreciate it if you guys could leave me a like on the post, and check out all my other guides - Thanks!